

Falls in bathrooms are predictable, preventable, and costly. Do you have a clear, simple plan to cut those risks for an older adult at home?
In this 2026 guide, you’ll build a lean Bathroom Safety Action Plan you can start this week. Quickly adapting the bathroom for a new roommate You’ll map hazards, choose quick wins, schedule upgrades, and lock in a routine that keeps seniors safer every day.
Expect practical steps, checklists, and timelines—no jargon. By the end, your plan will be ready to execute.
Clarity First: Map Real Risks
Every strong bathroom safety plan starts with a focused walkthrough. Ten minutes of targeted observation will reveal the top three hazards you must tackle first, not twelve nice-to-haves that dilute effort.
- Surfaces: Wet tile, curled mats, or soap film in the shower and near the sink.
- Transfers: Getting in/out of the shower, on/off the toilet, and up from a low seat.
- Reach: Towels, toiletries, and switches placed too high or too low.
- Lighting: Shadows at night, glare by day, and poor contrast at step edges.
- Temperature: Hot water burns or cold-room discomfort causing rushing.
Most bathroom falls happen during transfers. A plan that prioritizes stable handholds and non-slip footing outperforms any aesthetic refresh.
Turn this survey into a two-week roadmap: rank hazards by injury potential, then by effort/cost. Your plan should deliver one high-impact fix per week to maintain momentum and confidence for the older adult.
Film a 30-second video of actual bathroom use (with consent). Small hesitations reveal where your action plan needs precision support.
When you shortlist essentials, include a senior-friendly non-slip base for the shower as part of your first-week plan. Consider non slip shower mat for elderly to combine grip, drainage, and comfort.
Skip suction-only towel bars as “supports.” They are not rated for load. Your plan must specify secure grab points anchored into studs or reinforced walls.
Fast Wins: 48‑Hour Fixes
A good plan delivers safety now, not after a remodel. Secure a shower in a rental without causing damage In 48 hours, you can slash slip risk and improve night navigation before the next shower or toileting routine.
- Lay non-slip decals in the shower and a grippy mat outside the tub.
- Add plug-in night lights from bed to bathroom for a lit path.
- Reposition essentials at waist-to-shoulder height to avoid bending.
- Use a shower chair or transfer bench to stabilize bathing.
- Label hot/cold clearly and set max hot water to a safe limit.
| Low-cost steps (this week) | Higher-impact upgrades (project plan) |
|---|---|
| Non-slip strips; night lights; declutter; long-handled sponge | Walk-in shower or low-threshold entry |
| Shower chair; handheld shower head | Reinforced grab bars at three points (entry, standing, seating) |
| Raised toilet seat with arms | Comfort-height toilet with side rail system |
| Anti-glare bulbs; contrast tape at step edges | Hardwired lighting with dual switches and motion sensors |
Choose a mat that fits the shower footprint. Gaps create trip edges; oversizing causes bunching. Fit first, then texture.
For square bases, a snug, grippy option supports your 48-hour plan. See grey shower mat to align size and traction.
Test drainage after placing any mat. Standing water breeds slime and slip risk. Your plan should include weekly cleaning to maintain grip.

Stable Moves: Build‑In Support
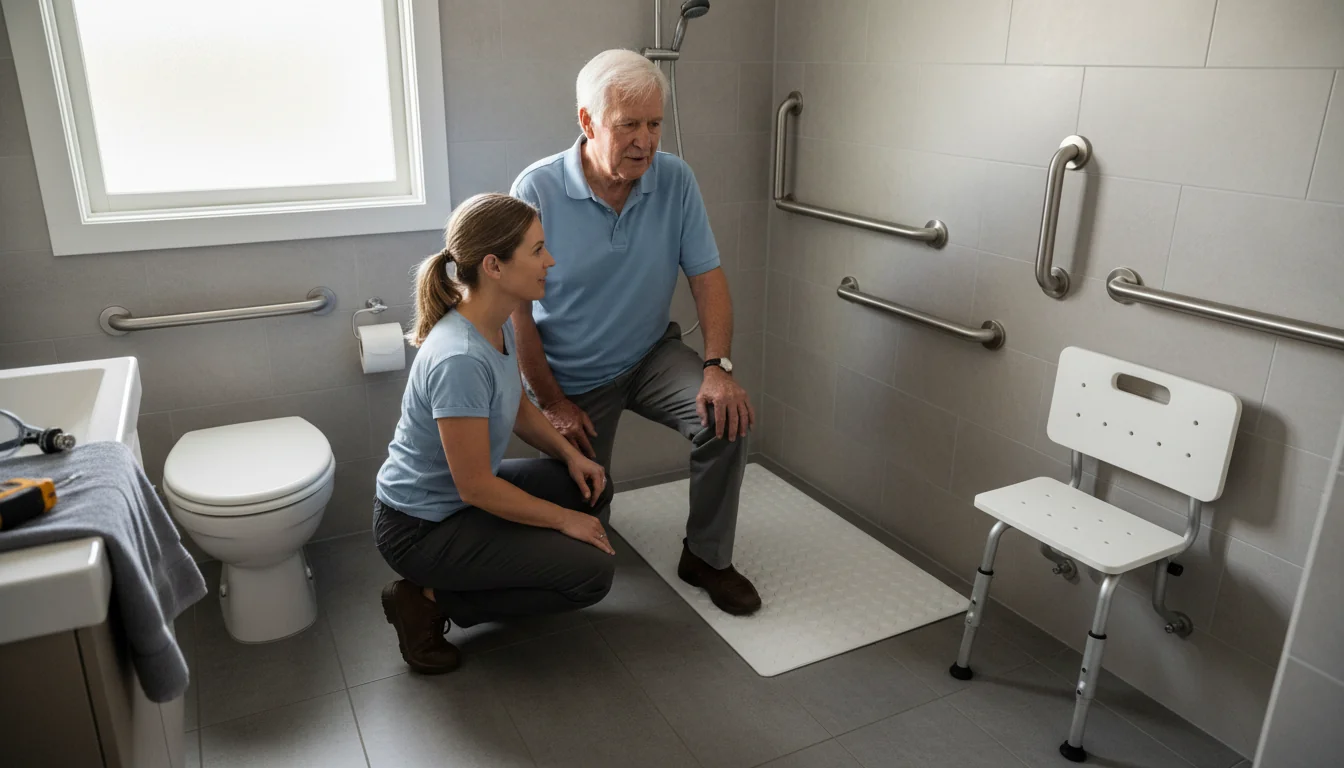
The next phase of your plan secures the movements that cause most injuries: stepping in, turning, and standing. Think firm handholds, predictable footing, and smooth transfers.
- Install grab bars into studs at entry, within reach of shower seating, and near the toilet.
- Swap twist knobs for lever handles on sink and shower to reduce strain.
- Consider a low-threshold or roll-in shower if steps cause hesitation.
- Adjust seat height: comfort-height toilets or add a secure frame.
- Balance lighting: bright, even, with no glare on wet tile.
Well-placed vertical rails at the shower entrance can reduce awkward sideways steps, aligning your plan with safer forward-facing transfers.
If your shower is rectangular, match coverage to footprint so feet never land on slick tile. A size-appropriate choice like antibacterial shower mat supports the movement strategy in your plan.
Mock the full routine before drilling: enter, sit, wash, stand, exit. Mark bar locations with tape to confirm the plan matches real reach.
Daily Flow: Safer Habits
Your plan is only as strong as the routine. Small behavioral tweaks reduce risk when energy dips, vision blurs, or urgency strikes at night.
- Night path: keep glasses handy, lights on sensors, and the route clutter-free.
- Hydration and timing: schedule toileting breaks to avoid rushing.
- Footwear: non-slip soles; avoid floppy slippers or socks on tile.
- Bidet attachments: improve hygiene without twisting; reduce fall-prone reaches.
- Emergency access: a wearable call button, especially during bathing.
Don’t lock bathroom doors. Use an “engaged/vacant” sign instead so help can enter quickly if needed—make this explicit in your plan.
Refresh the routine quarterly: revisit medication side effects, vision changes, and any new stumbles. This keeps your plan aligned with real life, not last season’s assumptions.
Teach “three points of contact” during transfers: two hands and one foot, or two feet and one hand. Put the phrase in your printed plan.

People & Budget: Coordinate Help
A bathroom safety plan works best with a small team. Clarify roles, timeframes, and costs so upgrades don’t stall and daily checks actually happen.
- Assign a “plan owner” who schedules tasks and logs fixes.
- Book an occupational therapist home safety evaluation if transfers are difficult.
- Use a simple budget: quick wins now; structural work in monthly phases.
- Explore local programs that assist with home safety modifications.
- Rehearse emergency steps: how to call, unlock doors, and guide responders in.
Short “post-fall reviews” improve plans. If a slip occurs, analyze lighting, footwear, and layout the same day, then update the checklist.
Set review cadences inside the plan: weekly light checks, monthly mat cleaning, quarterly transfer practice. Clear intervals turn intentions into habits.
Prioritize upgrades that support multiple tasks—grab bars aid showering and toileting. One investment, two gains in the plan.
How to Start: 5‑Step Bathroom Safety Plan
- Walk the room and list hazards. Rank your top three by injury risk.
- Execute 48‑hour fixes: non-slip surfaces, night lights, declutter.
- Anchor grab bars where hands naturally reach during transfers.
- Tune the routine: footwear, hydration, bidet use, and door access.
- Set a schedule: weekly checks, monthly cleaning, quarterly review.
Print your one-page plan and tape it inside a cabinet. If it’s visible, it’s doable.
Working with a compact base? Match safety to size with small square shower mat so your steps land on grip, not glaze.
Do not rely on decorative mats without traction backing. They slide when wet and undermine the plan.
Why build a formal bathroom plan?
Because structure beats good intentions. A written roadmap clarifies priorities, budgets time, and assigns roles. It also turns one-time fixes into routine checks that keep older adults safer over time.
How does this compare to ad‑hoc fixes?
Ad‑hoc changes help, but a coordinated sequence does more. This plan connects surfaces, supports, and habits so each improvement reinforces the next, especially during transfers.
What are the must‑have upgrades?
Three anchors: secure grab bars, non‑slip footing, and even lighting. Add a shower chair, handheld shower, and a raised toilet solution if standing or bending is hard.
Do I need a mat outside the shower too?
Yes. Drips make exits slick. A firm, non‑skid option like bath mat prevents that first step from sliding, a key detail in any safety plan.
Where should grab bars go?
Place them where hands actually reach: at the shower entrance, next to the seat, and near the toilet. Tape to test before drilling. Your plan should note heights and angles used.
How often should I review the plan?
Weekly for light checks and mat grip; monthly for deeper cleaning; quarterly for transfer practice and layout tweaks. After any stumble, do a same‑day mini‑review.
Any sizing advice for mats?
Cover the landing zone fully without curling. For elongated bases, consider an extended layout; for squares, choose a snug fit. Your plan should list exact dimensions to avoid returns.
A safer bathroom doesn’t require a renovation; it requires a clear sequence executed well. Start small, build support, and lock in habits.
- Map true risks, then act in 48 hours on quick wins.
- Secure transfers with bars, seat height, and even lighting.
- Maintain a simple schedule for checks, cleaning, and reviews.
Put your one‑page plan on the wall today. The next shower can already be safer.

0 comments